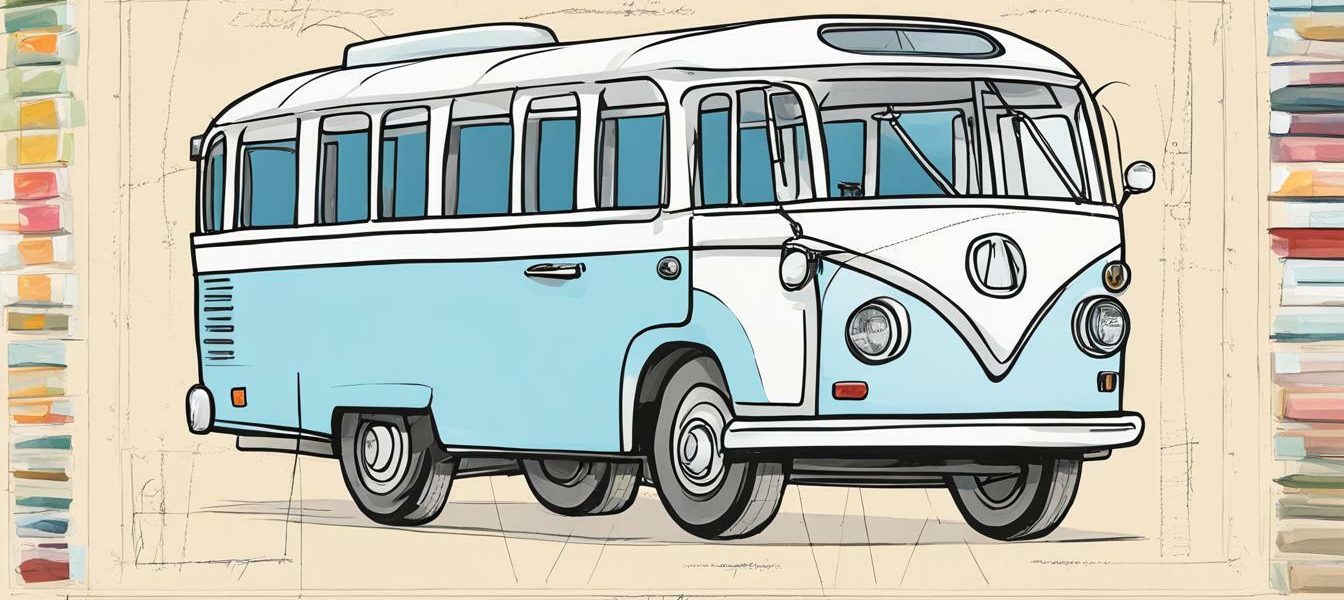
How To Draw A School Bus
Are you looking for an easy and fun way to learn how to draw a school bus? Look no further! In this step-by-step guide, we’ll show you how to draw a school bus with simple shapes and easy-to-follow instructions. This guide is perfect for beginners and kids who want to explore their artistic side, so grab your pencils and let’s get started!
Key Takeaways
- This step-by-step guide is perfect for beginners and kids who want to learn how to draw a school bus.
- We’ll guide you through the process using simple shapes and easy-to-follow instructions.
- You’ll learn how to add details, shade and texture your school bus, and create a background for your artwork.
- Practice makes perfect, so keep drawing!
Getting Started
Before you begin drawing a school bus, it is important to gather all the necessary materials. This will ensure that you have everything you need within reach and minimize distractions.
Materials
You will need:
- A pencil
- Paper
- An eraser
Optional materials include:
- Colored pencils or markers
- Ruler
- Compass
Workspace
Set up a clean, flat work surface such as a desk or table. Make sure that your chair is comfortable and that you have enough space to move your arms freely. Good lighting is also important, so position yourself near a window or use a desk lamp if necessary.
Basic Shapes
To start drawing a school bus, you need to first understand the basic shapes that form its foundation. This will make constructing the body of the bus much easier.
The main shape of the school bus is a rectangle, which forms the body of the bus. Draw it in the center of the page to ensure ample space for other details.
Next, draw two circles for the wheels at the bottom of the rectangle. Try to make them as symmetrical as possible.
To connect the wheels to the body of the bus, draw two rectangles or lines on each side. These will serve as the suspension.
Finally, draw a trapezoidal shape at the front of the bus. This will form the hood and grill of the bus.
Adding Dimensions to the Body
Now that you’ve drawn the basic shapes, it’s time to add some dimension to the body of the bus. This will make your drawing more interesting and realistic.
Start by rounding out the edges of the rectangle that forms the body. This will give the bus a more comfortable, kid-friendly look.
Add some depth to the bus by drawing diagonal lines inside the rectangle. These will serve as the seats inside the bus.
Adding Details
Now that you have the basic structure of the school bus sketched out, it’s time to add some details that will bring your drawing to life.
Start by drawing the windows. A school bus typically has several large rectangular windows on each side. Use a ruler to keep the lines straight if needed. Next, draw the doors. Most school buses have two large doors at the front and back of the bus, so make sure to add those in.
For the wheels, draw circles at the bottom of the bus where the tires would be. Add some smaller circles inside to create the rims. Finally, add the stop sign that swings out from the side of the bus, which is a unique feature of school buses.
Take a step back and assess your drawing to ensure that all the essential details have been captured, and make any necessary adjustments. Congratulations! You now have a recognizable school bus.
Shading and Texturing
Now that you have the basic shapes and details of your school bus drawing, it’s time to add some depth and dimension by shading and texturing. This step is crucial in making your drawing appear more realistic and visually appealing.
Here are some tips and techniques you can use:
- Start with the light source: Determine where the light source is coming from and shade the opposite side of the object. This creates a natural shadow and brings out the dimension of the drawing.
- Use a variety of shading techniques: Try crosshatching, stippling, or blending with your pencil to create different textures and shades.
- Add highlights and reflections: Use an eraser to remove some of the graphite and create highlights on shiny surfaces such as windows or the bumpers. Add reflections to any metallic parts of the bus.
- Experiment with different pencils: Try using different grades of pencil to achieve different levels of darkness and texture. A softer pencil such as a 4B or 6B will produce darker shades, while a harder pencil like an H or 2H will create lighter shades.
- Blend with a blending tool: Use a blending tool such as a paper stump or blending tortillon to smooth out any roughness in your shading.
Remember to take your time with shading and texturing. It may seem tedious, but the end result will be worth it.
If you’re struggling with shading, don’t be discouraged! It takes practice to master this technique. Keep experimenting and trying new things, and you’ll get the hang of it in no time.
Coloring Your Drawing
Now that you have completed the main outline of your school bus drawing, it’s time to add some color!
You can use any medium you prefer, such as colored pencils, markers, or paint. Remember to consider the color scheme carefully to ensure a balanced composition.
Look at photos of school buses or use your creativity to come up with new combinations. A classic yellow school bus with black accents is always a safe bet, but you can also experiment with other colors to make your school bus unique.
Start by filling in the larger areas of the drawing with the base color, then add details and highlights as you go. Don’t be afraid to mix colors or use shading techniques to create depth and texture.
Take your time and enjoy the process of coloring your school bus drawing. Remember, there is no right or wrong way to do it!
Background and Composition
Drawing a school bus can be a fun and creative experience, and adding a suitable background can enhance the overall effect. The choice of background can affect the mood of the drawing and provide context for the subject matter.
An easy way to approach background and composition is to consider the environment in which the school bus operates. For example, drawing the school bus in a suburban setting with houses and trees gives the impression of a regular school day. Meanwhile, drawing the school bus on a mountain road with sharp turns and rocky terrain conveys a sense of adventure or danger.
Experimenting with different perspectives can also add interest to the composition. Drawing the school bus from a low or high angle can create a sense of depth and scale. Additionally, adding a foreground element such as a tree or a signpost can provide a sense of context and layout.
Consider the composition as a whole. A crowded and cluttered drawing may detract from the main subject, while a simple and minimalistic background draws emphasis on the school bus. Take the time to experiment with different layouts and backgrounds to find what works best for the drawing.
Adding Final Touches
Now that your school bus drawing is taking shape, it’s time to add those final touches that will make it stand out. Take a step back and evaluate your drawing to identify areas that need improvement and refinement.
Highlight and Shadow
One way to add depth and dimension to your school bus drawing is by incorporating highlights and shadows. Consider the position of your light source and add highlights to the areas that would reflect the most light. Add shadows to the opposite side of the drawing, keeping in mind that shadows should never be pitch black. Use a lighter shade of your base color to create a natural-looking shadow.
Refine Details
Take a closer look at the details of your drawing and refine any rough edges or incomplete lines. Ensure that all windows and doors are proportional and symmetrical. Use a ruler or a straight edge to create crisp, straight lines. Now is the time to take your time and pay attention to the details.
Add Textures
Textures can add interest and realism to your drawing. Consider adding textures to the wheel wells and the rubber tires. Use a small, circular motion with your pencil to create a texture that resembles the tread pattern on the tires. For the metal body of the bus, try creating a subtle texture by using a light cross-hatching technique.
Final Thoughts
By adding these final touches, your school bus drawing will come to life. Remember to take your time and be patient with the process. You can always erase and start again if something doesn’t turn out the way you want it to. Don’t be afraid to experiment and try new techniques.
Section 9: Showcasing Your Artwork
After putting so much effort and time into creating your school bus drawing, it’s time to show it off! There are numerous ways to showcase your artwork, both online and offline.
Online Display Options
If you prefer to showcase your artwork online, there are many platforms to choose from. Consider creating a social media account, such as Instagram or Pinterest, dedicated to your art. You can also share your artwork on art-focused websites like DeviantArt or Behance. Don’t forget to use relevant hashtags to help your artwork reach a wider audience.
Offline Display Options
If you prefer physical displays, consider framing your artwork and hanging it up in your home, office, or local art gallery. You can also enter your artwork into art competitions or submit it to local newspapers or magazines for publication. This will give you the chance to get your artwork seen by a broader audience.
Sharing with Friends and Family
Don’t forget to share your artwork with your loved ones. They can be a great source of encouragement and feedback. Consider printing out your artwork and giving it as a gift to someone special. You can also create personalized greeting cards or postcards with your artwork to send to friends and family.
Remember, showcasing your artwork is a great way to build your confidence and get recognition for your hard work. Don’t be afraid to show off your skills and share your passion with others!
Practice Makes Perfect
Drawing is a skill that requires practice and patience. Even the most experienced artists were once beginners who had to commit to daily practice to improve their craft. If your first school bus drawing doesn’t turn out as you envisioned, don’t be discouraged. Keep at it and try again.
Set aside time each day to practice drawing school buses using the step-by-step guide provided in this article. As you progress, you’ll notice a significant improvement in your skills, and the process will become more natural.
Don’t be afraid to experiment with different angles, colors, and compositions. Take your time, and don’t rush the process. Drawing should be an enjoyable and therapeutic experience.
Remember, the more you practice, the better you’ll become, and the more confident you’ll feel in your abilities.
Additional Resources and Inspiration
There are many resources available to help you improve your school bus drawing skills and find inspiration for new projects. Here is a selection of some of the best:
- Drawing School: Fundamentals for the Beginner by Patricia Getha
- How to Draw Vehicles: Step-by-step drawing guide by Dinesh Kumar
- Draw a School Bus in Six Easy Steps tutorial by Art for Kids Hub on YouTube
These resources offer a variety of techniques and styles to explore. Don’t be afraid to try new things and experiment with your art.
If you’re feeling stuck or looking for inspiration, there are many online communities and forums dedicated to art and drawing. Joining one of these communities can provide a supportive environment to share your work, receive feedback, and learn from other artists.
“Drawing is not what one sees but what one can make others see.”
― Edgar Degas
Remember, drawing is a skill that takes time and practice to improve. Don’t get discouraged if your first attempts don’t turn out as you hoped. Keep practicing, learning, and trying new things, and you’ll be amazed at how quickly your skills will improve.
Conclusion
Learning how to draw a school bus is simpler than you might think. By breaking down the process into basic shapes and adding details, shading, and color, you can create a beautiful piece of artwork that you’ll be proud to show off.
Remember that practice makes perfect. Don’t get discouraged if your first attempts aren’t exactly what you had in mind. Keep practicing, and you’ll soon see improvement in your skills.
Explore additional resources such as books, websites, and videos to expand your knowledge and find inspiration. The more you learn, the more you’ll grow as an artist.
Now that you have the tools and knowledge to draw a school bus, it’s time to get started. Whether you’re a beginner or an experienced artist, the step-by-step guide provided here is easy to follow and can be completed in no time. So grab your pencil and paper, and start drawing!